Tools Used:
- Pencil & Sketchbook (Initial Concept Design Art)
- Pinterest (For References)
- Pureref (Reference Organising)
- Clip Studio Paint (Final Concept Art)
- Maya (Model Creation)
- Substance Painter (Model Texturing)
- Sketchfab (Model Displaying)
Initial Development of Ideas:
From the options that I was given I decided to choose to make a sci-fi helmet. As I felt I could comfortably generate the most ideas from.
References:
Here’s various references I was able to gather from Pinterest.

Concept Design Art:
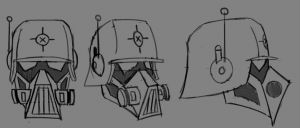
Rough Sketches:
Based from the references I gathered, I tried to explore ideas that stray from the complex and clean styles of conventional sci-fis. I wanted to go for a more simple rustic style of helmet, which led me into developing helmets either based on spartan and Medieval Knight helmets, along with World War 2 helmets and gas masks.
I developed 4 main ideas, giving them basic turnarounds and experimenting around with the details.
Final Design:
In the end I decided to go for a mixture between Helmet design 1 and design 4.

I combined the the masks from both of them, kepting the grill from 1 and taking the shape from 4. I wanted to put emphasis on angular shapes to give the model a dangerous industrious military vibe. For the helmet, I kept the brim and general shape from 4 and combined it with the radio earpiece idea from 1. I wanted the helmet to be angular but still noticeably round. To help get across the idea that this is meant to be a sci-fi soldier helmet, I added a crude emblem that is supposed to look similar to a crosshair or a target. I combined the visor shape from 1 & 4, and made the eye holes more angular.
I decided do not use the air tubes from earlier various of design 4 because I felt they would clutter the silhouette of the design. That and I wasn’t sure if I would be able give the impression that it could feasibly function without adding additional elements like an air tank to sell the effect. So to simplify the model I decided to give for two air filters on the front sides of the mask.
[Note: I intended for the eyes, maks grill, and air filters to glow, but isn’t fully illustrated in the final concept art]
Maya:
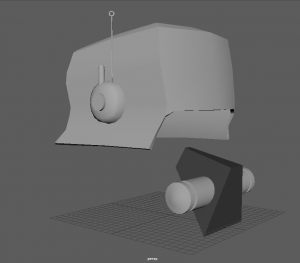
Block-in:
Before I did the initial block-in for the model, I looked at a video tutorial how to make a sci-fi helmet in Maya using Hard Surface Subdivision to get a better idea on how to begin to approach my model. I decided to construct the helmet in seperate pieces, as I felt it was the most straightforward approach that wouldn’t involve me tackling the unnecessarily complex geometry if I decided to do it as one or two pieces. Although this would lead to me creating unnecessary faces that would never been seen in the finished model.
I started with the helmet first, I made using a cube that I subdivided to get the appropriate proportions and defined it’s shapes and curves. I then moved on to the other pieces such as the two earpieces, two air filters, and the beginnings of the mask. I was told by one of the lectures to make use of instancing the ear pieces and air filters, so changes between them are consist. Added the antenna and dial for the radio on the right ear piece.
[Note: In hindsight it probably would have made a lot more sense to start with the head itself, as it’s essentiental the center of the model, and would have been
Progress:
Since the block-in stage I developed more elements of the model. For the helmet I added a crude brim using the split-cut and extrude tool, for the earpiece I extrude a circle outward, I made another square indent into the air piece (Not Shown), and I finished the rough version of the mask and defined the it’s grill. I also added a rough head with extruded angular indent for the eye, I passed it off general human head proportion. I also realised I had neglected to design a neck hole for the helmet in my initial concept designs. So I made by cutting a hole through the center of a cylinder and extruding a circular plane in the centre to obscure the bottom of the mask. As my initial design never intended to have an actually visible inside to the helmet, so I didn’t have to go back from the start a redo everything again.

New Head:
As I intentionally neglected to give it much thought, I wasn’t happy with head (Left) I had. The eye sockets when smoothed weren’t angular enough, and it overall was too boxy and flat. So I decided to create a new one from scratch (Right). I fixed the eyes by giving them more edges closer together so it will hold a sharper edge. I better defined the cheekbones, chin, and nose so it looked less boxy.
[Old Head (Left), New Head (Right)]

Final Models:
Here’s the final iteration of the helmet with all previously mentioned elements. In total the model consists of 13 separate pieces, not including backups.

UV Unwrapping:
Out of all aspects of the modeling process so far, I didn’t have a good understanding of UVs when I initially went to unwrap my model. I know what they did, but I didn’t understand the rules or process behind it, and I wasn’t sure what a good UV looked like. But despite that I was able to competently wrap 80% of my model, before I finally got to the mask. I still don’t know what happened but for several hours I struggled to get the mask to unwrap, whether it begin something wrong with geometry making it unable to unfold even after using clean-up options, messy edges where I couldn’t tell where edges where connected to accurately cut. After trying several different options and wasting hours trying to fix, I gave up on it started to make a new mask from scratch to avoid the same issues


.
New Mask:
When I created my original mask (Right) something had went wrong with, which I didn’t notice until I was trying to smooth and unwrap it. Some of the edges on the bottom weren’t connected properly, and while I tried to use the Quad Draw tool to fix it I kept on running into issues. So much like the head, I decided to make a new mask (Left) from scratch. While it might’ve been a bit excessive, I also wasn’t happy with how the old mask looked anyway, and I had mistaken made too many edges in trying to subdividing and bevelling it to the point were I felt it wasn’t worth the effort to try and salvage. The outcome, the new mask has better rounded edges and isn’t too cluttered by a excess of edges. I also pinched the top of the mask, so it would conform to the shape of the head better.
[Old Mask (Right), New Mask (Left)]

UV Complete:
After finishing the new mask I got back to unwrapping the UV. After successfully unwrapping the mask, I manually layouted all my UV shells after a few attempts. Here’s result:

Substance Painter:
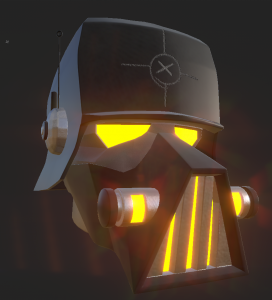
After resolving an issue where I couldn’t export my model as a FBX file I was finally able to bring my model into Substance Painter. Since I was quite comfortable with Substance I was able to comfortably use fill layers and masks to experiment with the various materials and settings. While I hadn’t made a colour palette or take into account the textures I could apply. I instead had a general idea inside my head of what I wanted. I did know for a fact that I wanted parts of the model to glow, which required me to learn how add Emissive channels, by watching a Youtube Tutorial. Here is the result of my first pass:

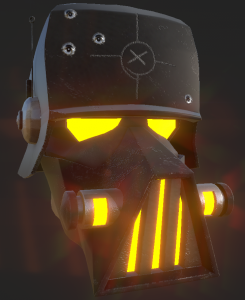
After that I started to get a better idea of what I wanted. Firstly, I didn’t want my model to be too reflective. Looking at modern military helmets, they’re rarely shiny, more often they are very matte. Which is something I wanted to translate into my model, but still leave some shiny surfaces for the sake of keeping it visually interesting. I decided on using dark grays because I just like how it fits the matte style. I didn’t like the orange glow from the previous version, so I changed it to yellow to contrast with the dark grays. For the emblem on the helmet I used one of the default chalk brushes, as I couldn’t find a better way to do it.
Details:
I eventually moved on to adding extra details to my model. Since the model consisted of a lot of flat planes, I wanted to add a texture to create some needed variation and depth so I added a scratch To emphasise the fact that this is meant to be a worn military helmet, I added bullet holes by creating a paint layer and using the default Bullet Holes brush. Learning from when I did the Hammer exercise, I remembered I could bake my textures and add a ambient occlusion smart mask over my entire model.
Here’s the final result:
Here’s all the layers I used in Substance Painter:

Sketchfab:
Settings:
After finishing the model in Substance Painter I exported all the textures and brought them into Sketchfab, along with the model FBX file. I assigned all my textures to their relevant places, much like I did with the Hammer and Can exercises from week 5. For future reference I need to remember to rename my model materials before exporting them from Maya so I don’t end up with several textures named “Lambert1”. For the lighting, I wanted to be bright enough to see the details but dark enough so the emission effects are decently visible. I haven’t done much with the post processing options before now, and I didn’t know how it would effects how the model will look. After messing around with the settings, I got a lot good effects with Bloom, Sharpness, and SSAO settings.
Here are all my settings for reference:


Final Result:

Reflection:
If I’m going to be honest, I went into this assignment half blind, as I couldn’t catch up with a lot of the exercises that were posted on Blackboard since Week 2. I did all the introductory exercises that explained the basics concerning Modelling, UVs, Substance Painter, Sketchable. But I never had the time to do the more advanced exercises which would’ve helped me with the assignment. Working on this assignment involved a lot of me realising I’ve done something wrong and finding out where I went wrong, then looking up how to fix it. There were points where I got frustrated how little progress I made, especially when I was stuck on modelling mistakes and UV problems, as well as several times I ran into software issues. But after exporting out of Maya, I enjoyed the texturing process in Substance Painter, although I feel if I had better be better versed in it, I could have developed my model further than I did. do feel I could’ve improved it more if I modelled more details like wires, iconography, or cut more sections of the model to create more depth. I feel like I produced a competent enough model that I am satisfied with, though I see parts I could improve on.
Video Links:
Sketchfab Link: https://sketchfab.com/3d-models/rustic-sci-fi-infantry-helmet-04e70299fb2d44cc934311e2020f4449