Apr
2023
Production
Background design
There are two main locations in my film Away with the fairies,
1. The fairy tree
2. The cottage
To start designing the background of my film I went on location, which was quite easy since I live on a farm! I went for walks through the fields which helped me come up with the story, and then my dad to me out to his friend’s farm to do some work, and the work was! Chopping down fairy trees! Actually, hawthorn trees. His friends was taking down some of the hedgerow and invited us to come along to help, and then any of the wood we chop down we can collect for our own fireplaces. I spent a few days here and was able to take in the landscape. There was an actual ring fort there with a standing stone, it was a great sight. I got up close to the trees, I found out that the type of tree that makes a fairy tree is called a hawthorn tree, also known as a white thorn. I collected the leaves and berries and took them home to study, I took pictures of the landscape as well which you can see here.
For the cottage, I want it to be small and charming. I usually go on a camping holiday to sligo and we would visit a cottage called Dolly’s cottage there, it is a relic. I vividly remember the little red door, and bed which looked to be inside a cupboard. I wanted to base my cottage off this. I wouldn’t be able to visit the cottage in person but I emailed the owners and asked if they could send me pictures of the inside and outside of it. As seen here in pictures from my Miro Board.


The simplistic backgrounds of Steven Universe seem possible to recreate. I love the backgrounds to the unreleased Winnie the Pooh show Cartoon Saloon were making. I love their organic nature and defiance to perspective. I also love how the frame the characters.


I made a friendly feeling colour Palette for my backgrounds so they would look like they come from the same film.
Tommy’s cottage –

Outside the fairy tree –

The fallen tree –

Instead of drawing a new background for one shot I sneakily distorted it.

Animation
My film is going to be 2d animated so I have decided to use Toon Boom Harmony. My research showed that it is an industry standard software which will prepare me for the workplace and I have already used this software for a small project last year, so I shouldn’t have too hard of a learning curve to get started with.
Youtube is being a very handy tool in learning this software, there is many useful functions that I wouldn’t have known about without the aid of these guides.
I have thought about the advantages and disadvantages of rigged vs hand drawn animation. Rigged should be easier and faster, but then is limited, hand drawn allows for freedom and more exaggeration. I decided to go with handrawn because I love the expression you can achieve with a pencil, and that’s what I want to be working with throughout this long project more than a mouse.
What do I want for the animation style?
I have some inspirations to the animation style of my film. It will be my style, following my character designs of the characters, but how they are animated is a different question. I have to be realistic, I know I am not yet skilled or experienced enough to match the quality of a classic Disney film. I am also working on my own, doing the entire production process by myself so I will not have the time to do these constant revisions.
I watched this documentary on the making of Lilo and Stitch and you could see them pendantically point out a single frame where the eye of the character wobbles slightly.
When watching other animations with a lower budget, mostly tv shows, you can see them do tricks, like hold a character in one expression for multiple frames, or they go off model to give an extreme reaction.
I love when this is done in the cartoon network show, OK KO Lets be heroes, it adds more humour to the scene.
I also like how in Wolfwalkers by Cartoon Saloon, the wolves are drawn in sketchy lines compared to the clean line art of the towns people, I may try this with the Fairy in my film, to add more to his otherworldliness nature.
I refreshed myself on the 12 principles of animation from Richard William’s book.
- Squash and stretch
- Anticipation
- Staging
- Straight-ahead action and pose-to-pose
- Follow through and overlapping action
- Slow in and slow out
- Arc
- Secondary action
- Timing
- Exaggeration
- Solid drawing
- Appeal
I’m starting the animation of my film with a scene in the cottage, I hope to clean it up and composit it to give me a good understanding of how long the entire film will take to make.
The scene in the cottage has no dialogue either so I will not need to worry about the lip sync yet. See the link below for my work in progress lineart.
Story change
I have been feeling concerned about the length of the film, and I am seeking ways to make it shorter and cut some corners. This is one of the struggles of working alone, I have no one to bounce the ideas off of, I was afraid I was getting tunnel vision and nobody else would understand what is going on in the story. I’ve been bouncing the ideas off family members and friends, even customers at work, I decided to take to Twitter and ask if anyone with experience with screenwriting could give a few pointers! Two people reached out, both Emmy winning screenwriters. One was David Quantick and he gave the idea of allowing Biddy togo ahead with doing away with Tommy and then Tommy interjects asking, what are you going to do after this? I liked this idea, and wrote a new script rewriting the ending.


I have gotten more used to Toon Boom now and my speed is picking up. I finished the sequence in the cottage and my tutor advised that Tommy appeared to small when sitting on the chair at the end, the timing is good, but there are some issues with the shape and volume I was advised about. I will fix the issues with Tommys size, luckily the software will allow me to do so without redrawing him again, It is recommended that I move on to the next stage though, as I need to continue to making progress.
I have Chris’ voicing for Biddy now which is making animating the character a lot more exciting. It does suit him! I am using my own voice for animating Tommy’s dialogue temporarily.
I have been following the animators survival guide for tips on the interaction between the two characters, Williams goes into detail in his book on how to do a head turn, which I used for Biddy and helped inject more personality into his character, which you will see in my film.
I also followed tips on a walk cycle, as I decided to let biddy walk up to Tommy so the film won’t be as stationary, this will be seen at the end of my film.
You can see this here –
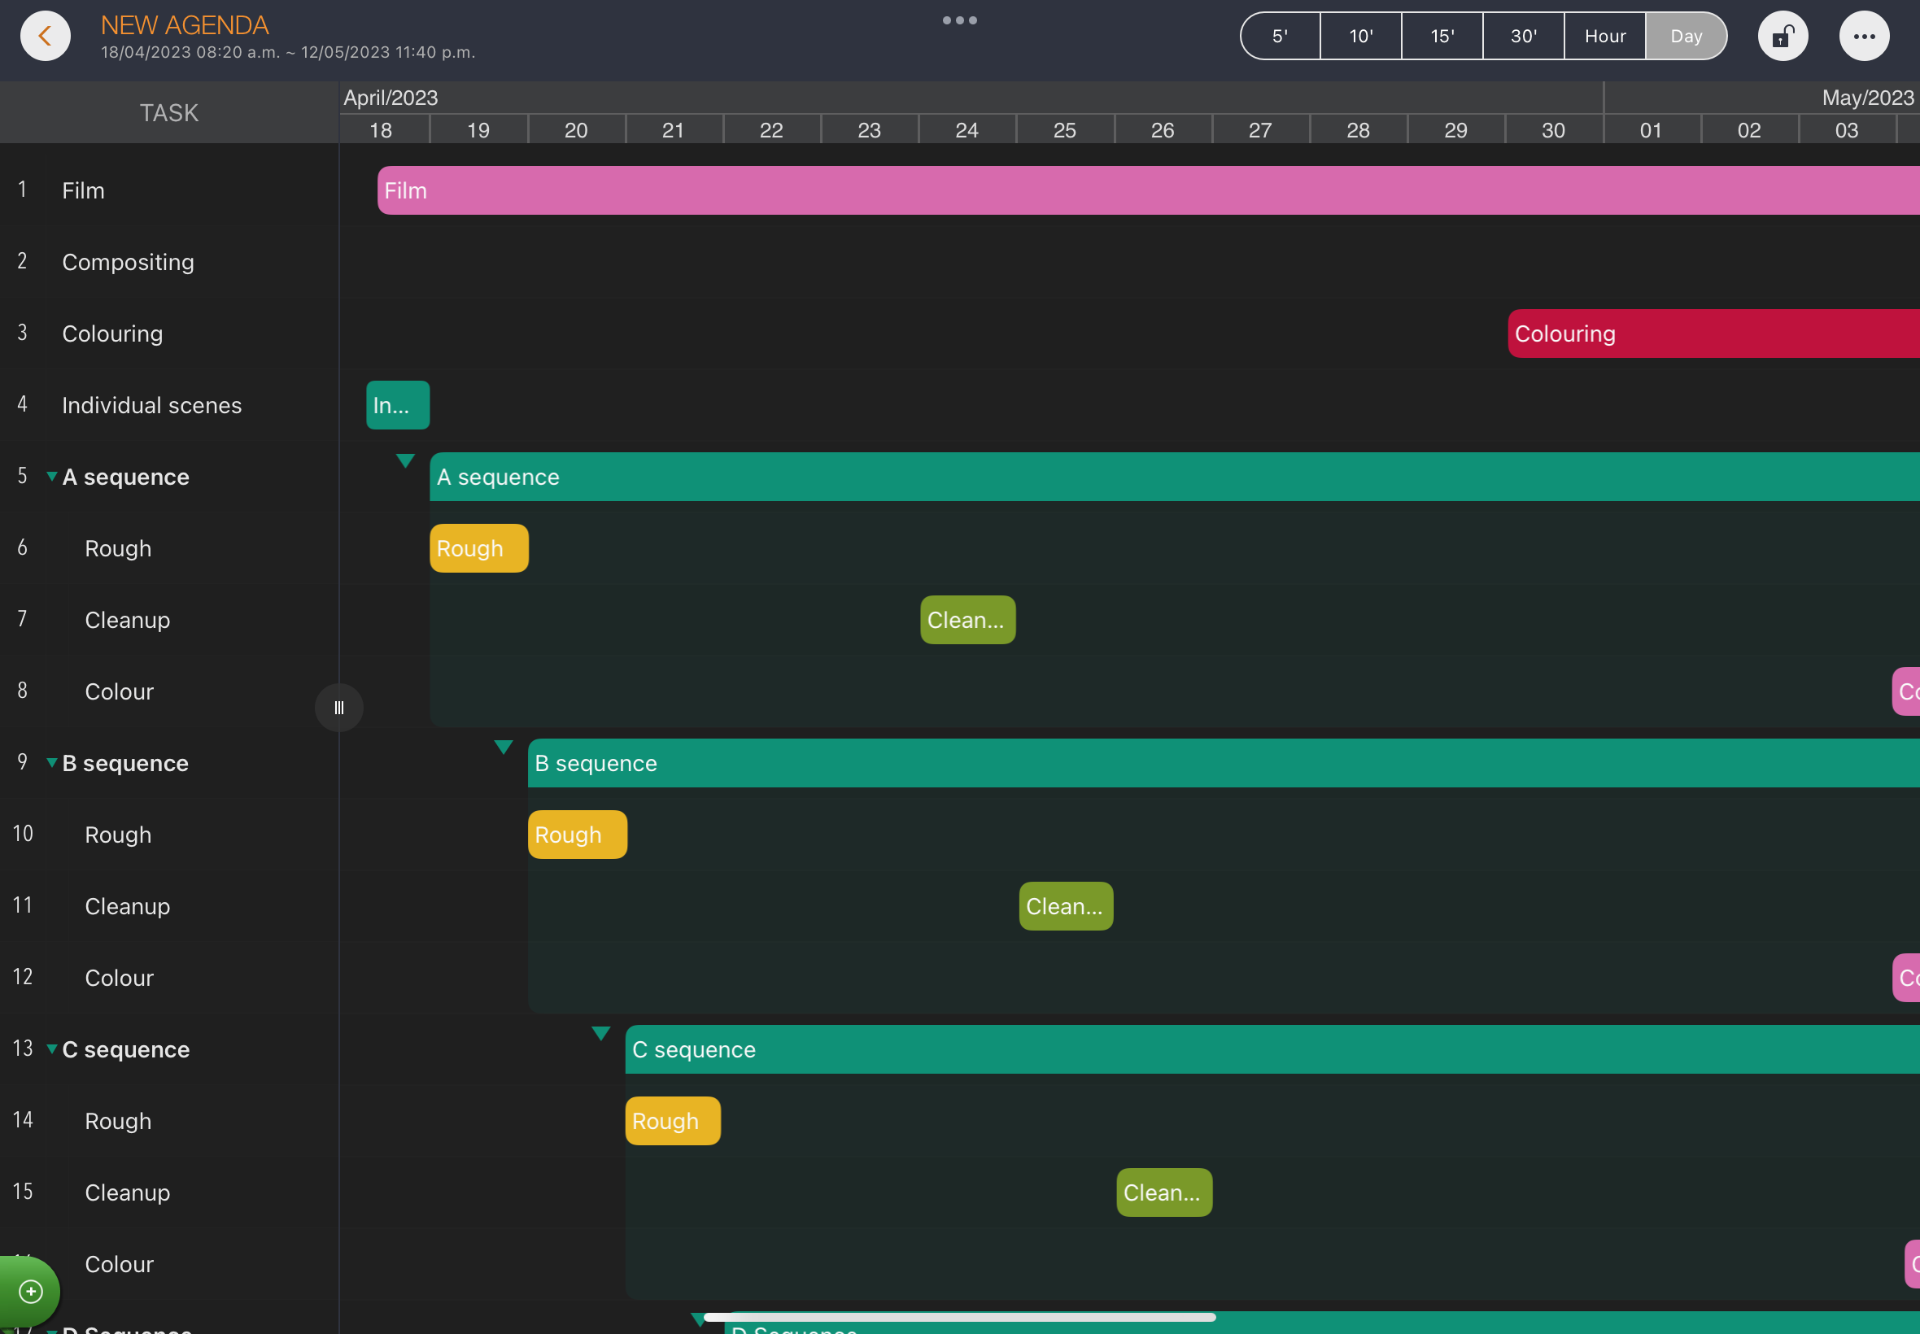
Below is a screenshot of my Toon Boom harmony timeline. I start animating by thumbnailing out the scene, then in a new layer I clean up these thumbnails, which I then develop into keyframes and I draw the inbetweens. It takes a couple more passes to clean up. Then I check over my drawings to make sure there is no gaps so I will be able to use the fill bucket tool with ease when colouring.

Colouring
Colouring the animation was one of the nice parts of the project and I was happy that it didn’t take too long. My film has simple flat colours, I was able to make a colour palette of each of the characters in Toon Boom and import it into all my scenes. I was able to pick the colours out by importing a picture of the turnarounds and using the eyedropper tool.
I’m suprised yet again about how long animation takes, at the start of the year when I planned out my pipeline, I looked at the months and thought, yeah I’ll do animation in January, finish in April and then composit in May. It hasn’t turned out that simple. In my session this week my tutor advised me to make A Gannt chart to plan out the rest of the project to all the fine details. I have started working on one, and have included all my main sequences in it.
I animated the tree in After effects. I uploaded pieces of the rig to my google drive folder dedicated to the major project, this then allowed me to download the rig on the computer.

I did a little extra animation of a couple cows in procreate with the animation assist feature on my Ipad.I used overlapping action in the left cows tail, as seen below.

I am quite pleased with how the animation turned out, it manages to tell the story, and the characters feel alive to me now. The style matches the story I wanted to tell.